Showing posts with label Charm Pro. Show all posts

Tuesday, December 08, 2015

My 2015 Christmas Wishlist


Hello December!

I am not yet done with my Christmas shopping but I definitely have something for all my god children so, kids, I will see you on Christmas Day! But of course, it’s not just about giving and sharing what you have but also giving something for yourself… And so I’m creating this wish list. I’m not saying I NEED TO HAVE THESE by Christmas but what I mean is that I’m hoping to get one of these for myself on Christmas and this can also serve as a guide to all my friends and loved ones who might be thinking about what to give me. Teehee!

Sunday, February 26, 2012

The Cosmetologie 2012 Experience


Hey y'all! Wasn't very active yesterday online. I just had my 3rd molar extracted for my braces and it was, actually, considered as a minor operation. It wasn't a pretty sight and stitches had to be done. I was supposed to attend the A1/Blue/98degrees concert last night but because of the extraction, I just couldn't. I thought I'd be strong enough to go but I stand corrected. Anyway, enough of the depressing situation yesterday. Let me tell you guys about what happened to me during the Cosmetologie 2012.

Monday, January 16, 2012

Suesh Brush Guard


Ever since I got hooked into using makeup, I've been hearing the name of Suesh and how good their makeup brushes and tools are. I've been wanting to buy something from them but you know how kuripot I am and they're stuff are not very cheap. Well, they're not very expensive either, but I've been overspending with the products themselves that sometimes, I tend to forget how important good tools are. So, when I passed by Suesh's booth at Trinoma this time, I stopped by and checked out the stuff they've got and this is one of the things I bought.

Wednesday, December 28, 2011

FOTD: Fierce Red Lips


This is my very first FOTD wherein I had red lips. Well, this is the first time I had red lips because red lips doesn't usually look good on me or that's what I think. You be the judge. I usually just do pink lips because that's what usually looks good on me; but I love how fierce my face looks in this FOTD so I'm sharing it to you guys. Enjoy!

Friday, December 09, 2011

My Charm Pro Brushes from Multiply


 I'm so excited to get my hands on my new brushes. Yes, I ordered new makeup brushes and it's all thanks to Multiply Philippines and Bloggers United. As you all know, I attended the Bloggers United Bazaar part 2 last Dec 3, 2011. I got to buy great stuff from the bloggers I love and the event was really a success.


I'm actually on my way out and was bidding everyone goodbye when Anagon asked me if I want to go to the Multiply Booth for a GC. Who was I to say no to a GC, right? LOL. Anyway, the Multiply Booth was so comfy and you would really want to go shop all day.  Anagon introduced me to Erben from Multiply Philippines and she asked one of their staff to assist me with my shopping. 


There I was sitting comfortably at the bean bag, in front of the laptop and have a 500 GC to splurge on Multiply. Where would the likes of me go? Wait, was that even a question? Of course the GC would all go to makeup / makeup tools. I immediately went to the Digital Traincase and browsed on.


 I chose to buy the Charm Pocket Brush Set. Sakto it's P500! As I watched how the order was processed, I must say, it's easier than before when you need to comment on the product's picture, wait for the seller's reply and stuff; ask the seller for modes of payment, basta! It used to be a confusing process. Now that Multiply has, finally, become an e-commerce social networking site of some sort, shopping there is a lot easier than before.


Here's how ordering is done:
Click on the product you'd be buying (Pretty basic)

Click the BUY NOW button found at the bottom of the product's page

Confirm your order and proceed with checking out

Choose your Shipping Option, click the Enter Address and (DUH) enter your address there once a pop-up window shows up. Choose your payment option at the side and a discount code if you have one

DONE! :)
Easy, right? You just need to follow the instructions, answer everything that needs to be answered and you're done. They actually informed me, via email, that I'd receive the item early next week due to the numerous orders they have processing; but the order arrived early and I was super happy to get my hands on my new Charm Pro Brushes.


Might do a review about the brushes after I've tried them. Again, thanks Multiply Philippines, Bloggers United and Anagon.


Till next post everyone! :)

Tuesday, November 08, 2011

How to Apply Your Liquid Foundation


Before you go on applying those blushes, eye makeup and all those other stuff, one of the first things we do is to apply our foundation. The most commonly and easiest foundation to use is the liquid one. We have to admit that we do have different ways on how we apply our liquid foundation. So, for this blog post, I will share to you guys the tools I've used and how I have applied my liquid foundation. Shall we start?


Fingers


My fingers were my first tools. For starters, you just need clean fingers/ hands and you're good to go and no need to for those expensive tools. Our fingers are super versatile. So what I do is I put some liquid foundation on my fingers and then I dot it initially on the parts which I think needs more coverage; like on my under eyes and wherever I have a blemish. After doing that, I blend it outwards from the center of my face softly going out until I get the coverage I want. It's an easy and definitely the cheapest way of applying your liquid foundation.


Sponges


When I figured that using my fingers were a bit messy for me, I had to find an alternative and a cheap one, still. I found these sponges from Marionnaud and they only cost less than a hundred peso plus you get two in one pack, great deal. So what I do here is to apply the liquid foundation at the back of my hand and then I will dab the sponge on to the product on my hand and just apply it onto my face while directly blending it as well. You can use the back of your hand as some kind of like a palette so that's how it goes. The problems I've had with the sponge are (1) Not all your product will be put on your face as the sponge would be able to absorb some of them and (2) You'd have to, eventually, replace this as soon as it gets too dark. I tried washing it but it doesn't really give back the initial stiffness and performance it had given me.


Foundation Brush


After I've realized how a lot of the product would be wasted when I use the sponge, I immediately sought after the help of the next available option which won't cost me much, still. I bought the Marionnaud N33 Foundation brush and based on its label, it really is made for foundation. I saw a Youtube Beauty Blogger using a Foundation Brush and since it's more or less 200 pesos, why not give it a try. What I did was, again, apply the product at the back of my hand and dip the foundation brush there and apply it on my face, first, and then blend it afterwards. I'm kind of having a hard time blending because as time goes by, the brush became packed and then they would all bend the same direction. The ending would be using my fingers. This was a total failure. So, I need a new one; and this time I should never go wrong.


Dual Fiber Brush / Stippling Brush


Anly, a friend of mine, is the owner of the online shop Colorful Indulgence and she re-sells the Charm Pro Brushes which is originally sold by her beauty blogger cousin, Sophie of Beautynomics. For everyone's information, I am a super "kuripot" person; and though I may have always spend too much on makeup it's because I buy affordable local makeup and buy a lot so I think I'm able to save through that. This is the most expensive brush I have bought and I was not disappointed. This brush costs around 700-800 pesos and it's definitely worth every penny. Ever since I bought it, I've used it every time I'm applying my foundation. At first it was quite hard to use it when blending; but I learned eventually and it did give me the coverage I wanted and surely, no product was wasted. What I do is, again, apply the liquid foundation at the back of my hand, dip the stippling brush on the product and then stipple the product all over my face. After stippling it on the necessary areas, I, then blend it until I get the desired coverage.


So far, the stippling brush is the best way for me to apply liquid foundation. I know there are other ways on how you can apply your liquid foundation; but these are the ones I've tried and I just want to share with you how they worked on me. My blogger friend, Codename Aya, uses a Sigma F80 which is a buffer brush. According to her, it helps her spread the liquid foundation more evenly and effortlessly. If you want to know more on how she does her foundation, you can go ahead and give her a tweet: @CodenameAYA.


Hope my entry helps some of you who are still searching for the perfect way  to apply liquid foundation. If you are satisfied with how you do yours, do share your tip for everyone else to read at the comments section below. Would love to hear your thoughts and your liquid foundation routine.


Till next post! :)

Sunday, September 25, 2011

FOTD: One Fine Sunday


One fine Sunday, I decided to do this look. LOL. This is the look I had when I went to the church together with a brown off-shoulder vintage looking-floral dress. The dress may be"manang" type for some but I do love the vintage look and I think it looks good on me so I'm disregarding the "manang" stereotype. Anyway, we're talking about my makeup look, right?


PRODUCTS USED:

EYES

- Shawill Eyebrow/Eyeliner Pencil & Brush
- ELF Eyelid Primer
- Clinique Colour Surge Eye Shadow Duo in Rosewine
- Love & Beauty Smokey Palette
- Wet N Wild Color Icon Brow and Eyeliner in Black
- Rimmel Waterproof Sexy Curves Full Volume and Curve Mascara

FACE

- Belo Essential Day Cover
- Aerie Color Matte Liquid Foundation in Almond
- Maybelline FITME Blush in Medium Coral
- Beauty Treats Minerals Camouflage Mineral in Medium

LIPS

- NYX Round Lipstick in Frappucino
- NYC Liquid Lipshine in Fashion Ave Fuchsia 

HOW I DID IT:

Remember the first step is to always apply the moisturizer first and foremost before doing your daily makeup routine. After the moisturizer, I applied the Aerie Color Matte Liquid Foundation in Almond by stippling and blending it all over my face using the Charm Pro Stippling Brush. Even though it's a matte foundation and it gives off a powdery finish, I still want to play safe and set it off with the Beauty Treats Minerals Camouflage Mineral in Medium using my ELF Total Face Brush. For my blush , I used the Props Blush Brush to apply the Maybelline FITME Blush in Medium Coral on my cheekbone going slantly upwards.

Let's now proceed with the eyes. First I did was line my brows with the Shawill Eyebrow/Eyeliner Pencil & Brush. After that, I applied the ELF Eyelid Primer all over my lids  and used my Marionnaud Brush to apply the lighter brown shade from my Clinique Colour Surge Eye Shadow Duo in Rosewine on my lids and the darker brown shade on my crease. After blending it well, I used the white shade from my Love & Beauty Smokey Palette to highlight my brow bone. For my waterline, I used the Wet N Wild Color Icon Brow and Eyeliner in Black and the Rimmel Waterproof Sexy Curves Full Volume and Curve Mascara as my mascara after curling my lashes with the G-Lish Eyelash Curler.

For my lips, I applied first the NYX Round Lipstick in Frappucino and since it gave my lips a kind of like a nude look, I topped it with the NYC Liquid Lipshine in Fashion Ave Fuchsia.

This is almost similar to yesterday's FOTD but the difference in liquid foundation made a big difference. The FOTD yesterday gave my face a natural and refreshed look while this one made it look blemish-free and smooth. Great coverage for the Aerie Color Matte Liquid Foundation in Almond.

Till next post! ;)

Saturday, September 24, 2011

FOTD: The Family Reunion


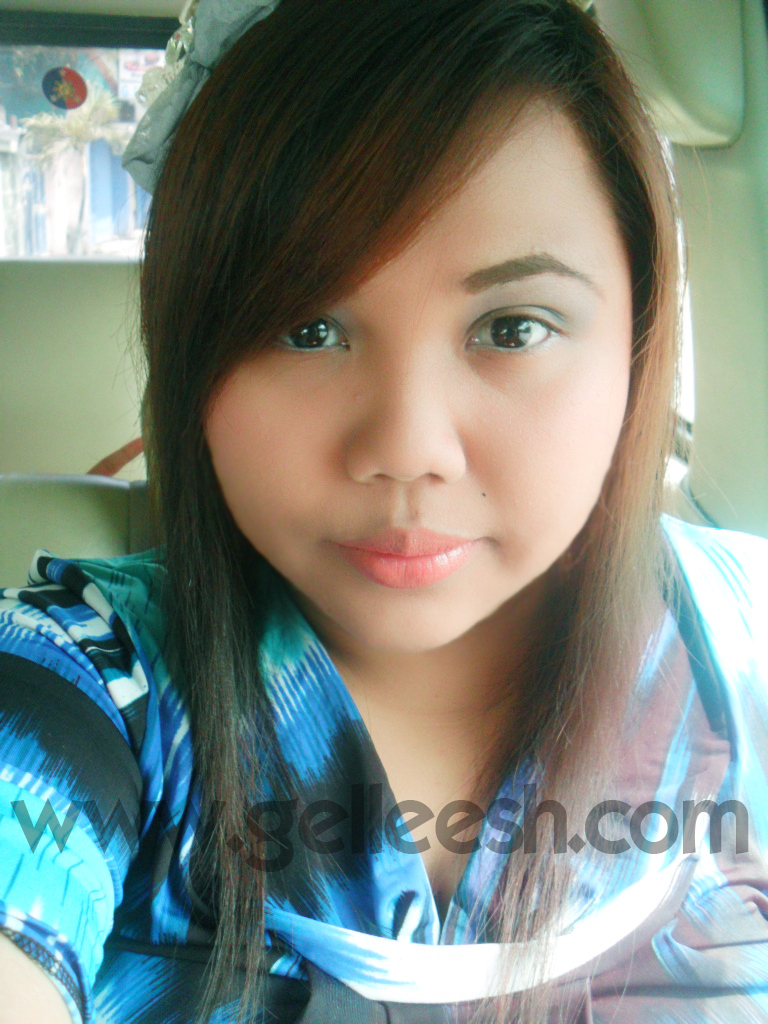
I went to Bulacan with my family today. I woke up a bit late so I kind of need to rush with my makeup and everything. I only applied liquid foundation and lined my brows at home and did the rest of this look inside Sporty (our Sportivo's name. LOL). The curled hair isn't originally part of the look. My cousin did this and it turned out great (for me). So let's start with how I did this.

PRODUCTS USED:

EYES

- Shawill Eyebrow/Eyeliner Pencil & Brush
- ELF Eyelid Primer
- Purple Eyeliner
- Clinique Colour Surge Eye Shadow Duo in Rosewine
- Love Minerals by Human Nature Mineral Eyeshadow in Enchanted Evening
- Rimmel Sexy Curves Full Volume & Curve Mascara (Waterproof)

FACE

- Belo Essentials Day Cover
- Beauty Treats Liquid Foundation in Beige
- Beauty Treats Camouflage Mineral Concealer in Medium
- Sansan Concealer in Beige
- Maybelline FITME Blush in Medium Coral

LIPS

- Watsons Moisturizing Lip Balm in Sweet Strawberry
- Almay Ideal Lipcolor in Pink

Makeup and tools I used


HOW I DID IT:

First I applied the Belo Essentials Day Cover all over my face. It contains SPF 15 to keep my face protected from the UV rays of the sun (Bongga!). After that, I applied the Beauty Treats Liquid Foundation in Beige using the Charm Stippling Brush and used the Beauty Treats Camouflage Mineral Concealer in Medium to set it on my face. I remembered an article I read wherein Kim Kardashian likes using concealer on her cheek bone, so I did. Using my Charm Stippling Brush again, I applied the Sansan Concealer in Beige on my cheek bone and using the Props Tools & Cosmetics Blush Brush from the 20pc Brush Set, I applied the Maybelline FITME Blush in Medium Coral below my cheek bone.

For my eyes, I lined first my brows using the Shawill Eyebrow/Eyeliner Pencil & Brush. Then, I applied the ELF Eyelid Primer on my lids. This is actually my first time to use a primer and it really did prevent the colors on my eyes to crease and it brought out the color more. For the colors I used, I applied lighter brown shade on my Clinique Colour Surge Eye Shadow Duo in Rosewine and the darker brown shade on my crease. I was looking for a color to highlight my brows and I forgot to bring a white eyeshadow, so I used the lightest purple shade from my Love Minerals by Human Nature Mineral Eyeshadow in Enchanted Evening and I think it worked out pretty great. Then I used the Purple Eyeliner on my waterline and used the G-Lish Eyelash Curler I bought recently which only costs P50 and it even comes with a pair of tweezers. Pretty neat, right? For my mascara, I used the Rimmel Sexy Curves Full Volume & Curve Mascara (Waterproof). Aside from L'Oreal Voluminous Naturale, this is definitely one of my favorite mascaras.

For my lips, I used the G-Lish Lip Brush to apply the Watsons Moisturizing Lip Balm in Sweet Strawberry and then used the Almay Ideal Lipcolor in Pink to add color.

I loved this look because it looks naturaland not overly done. I'm so through with overly done makeup. I remember my college days, when I was still flunking makeup, I used to think bright blue eyeshadow looks great and when I saw my pics back then, I just wished I knew how to apply makeup during those picture. They were just so crazy. 

Anyway, how was your Saturday? Hope you all had a great one! Till next post! ;)


Monday, August 22, 2011

FOTD: A Bit Like Blair


This is the look I had when we went to Bulacan for my tita's birthday last Sunday. I was all femme and proper that day and so is my makeup. As you can see, I'm wearing a bow headband again. I so love bow headband, it's makes someone look young and it reminds me of Blair Waldorf from the Gossip Girl TV series. I loved the book and I loved the TV show as well. Anyway, enough of the Gossip Girl talk and let's go on to my FOTD (Face Of The Day).

PRODUCTS USED:

FACE

> Belo Essentials Day Cover
> Beauty Treats Liquid Foundation (Beige)
> Ever Bilena Single Blush-On (Rose)
> Ever Bilena Pro Longwear Loose Powder

EYES

> Ever Bilena Color Pencil (Brown)
> White Eyeliner
> L'Oreal Voluminous Naturale Mascara
> Love & Beauty Smokey Palette

LIPS

> Watsons Moisturizing Lip Balm (Sweet Strawberry)
> MAC Satin Lipstick (Mocha)


HOW I DID IT?

We all need to use a moisturizer first before anything else. This is my new new day moisturizer so I want to include this in my FOTD. It actually has spatula which makes it easier for you to apply without dabbing your finger inside of it. After applying this, I applied the Beauty Treats foundation using my new and favorite brush from Charm Pro. It's a stippling brush and I'm so loving it right now. After evenly applying the liquid foundation, I then set it off with the Ever Bilena Loose Powder.

For the eyes, I lined my brow using the Ever Bilena Color Pencil; then, I used the gray shade from the Love & Beauty Smokey Palette on my lids, The black shade on my crease and the white shade on my brow bone. To make my eyes look less tired (because I always sleep late) I used the white eyeliner on my waterline. It will make your eyes look bigger and less tired. After curling my lashes, I used the L'Oreal Voluminous Naturale mascara to create a thicker look for my lashes.

For my blush, I used the Ever Bilena Single Blush-On applying it slantly upward to make my face look thinner. Haha! Then, for the lips, I applied the Watsons Moisturizing Lip Balm, then the MAC Satin Lipstick in Mocha for a natural and subtle look.

It is a natural but noticeable look you can use during family gatherings or on a day event. As you can see, my two zits are noticeable here. The one is under my eye on the left and the other is above my brows on the right. I'm trying to maintain a natural look so no covering up of blemishes; but the pimples are also because I forgot to take off my makeup a few times last week because I was so exhausted from work that I slept on our sofa and woke up the next day without washing my face or whatsoever. Eww right? Anyway, I have learned my lesson I hope you all love this look and if you tried to re-create this, hope you could link it below. Till next blog post! ;)

Monday, August 15, 2011

A Charming Package


I have been wanting to have a stippling brush but it's just hard to find a good and inexpensive one; but then I realized that good stippling brush doesn't come very cheap so I need to invest money to get the quality product I want. I got this brush from The Colorful Indulgence and its SRP is PhP700; plus they gave me a free purple watch. I so love pink and purples! I'm so gonna wear this to work tomorrow. I would want to make a review about this stippling brush soon. I am so excited to try this! This is my first stippling brush.


If you have inquiries and would want to have fast answers, you can tweet The Colorful Indulgence at: http://www.twitter.com/Anly4CIndulgence. Fast transaction and very friendly. 

Till next post! ;)
Related Posts Plugin for WordPress, Blogger...